|
Another Drake AC-4 Power Supply Upgrade Written By: Jeff Covelli / WA8SAJ - wa8saj@ncweb.com
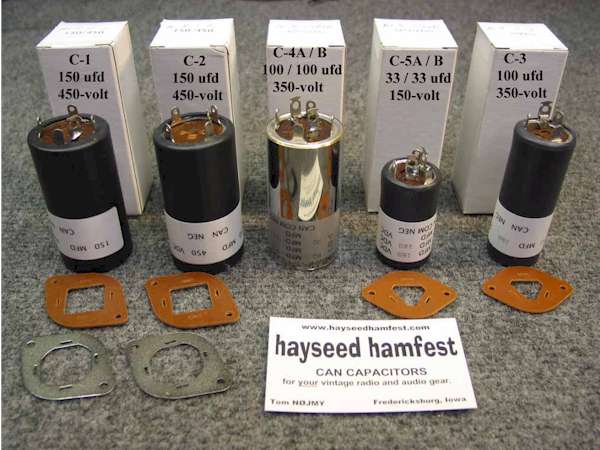
New Twist Lock Capacitors I wrote in awhile back about the Drake AC-4 power supply using the AC-4R kit from the Heathkitshop.com. This has been very successful in working and since then, another way of re-building the AC-4 is by using the actual ‘Twist-Lock’ type can capacitors. Around the year 2006, Tom (N0JMY) from Hayseed Hamfest (Hayseedhamfest.com) was coming out with new ‘Twist-Lock’ capacitors for many of the receivers like Hallicrafters, Drake, Heath-Kit, and Hammarlund. These were single and some multi-section capacitors. I bought some of them and have used them for the past 5 years with very good success, good quality and drop in after removing the old ones. Drake Dilemma I have re-built about 500 of the AC-4’s using the AC-4R circuit board and it works fine, but many of the folks have ask me if I could try and keep the original caps in place and use other capacitors on the bottom and not remove them, so it looks like the original. I have done that also, but it is not fun and very labor intensive. The caps are all axial lead type (length wise leads) and you have to use a few more terminal strips to install them correctly and not just tap across the old original capacitors (not a good idea). I have seen many power supplies come in and the original capacitors are tapped with new caps and the old ones have smoked (shorted) causing havoc and a real mess! I contacted Tom at Hayseed Hamfest to see if he could make up the actual drop in ‘Twist-Type’ capacitors. Not only did he do that, but also includes the insulated wafers and has used very thick ‘Heat-Shrink’ to cover the capacitors and black PVC for end caps that are used for the two voltage doublers in the AC-4. Using the ‘Heat Shrink’ protects anyone from getting shocked, since there is high-voltage (150 to 350-volts) on the caps on top of the chassis. The new capacitors are equal to or better than the original capacitors, along with their ratings at a temperature of 105C. The old capacitors were rated at 85C. This is a large difference when your talking about a power supply that gets warm and is covered up. One thing about using the new ‘Twist-Type’ capacitors, they just drop in like the originals and the rest of the parts stay in their respective locations. Doing this approach makes the AC-4 look like the original.
The capacitor ratings are:
All rated at a temperature of 105C!
Installation I have found the best way to remove the old capacitors, is to use large needle-nose pliers and grab the old twist tabs. Working the pliers back and forth until they finally come off and then pull the old cap out. Now for the ones that are soldered to the chassis, I use a 300-watt Weller solder gun to melt the solder and at the same time work the needle-nose pliers to un-twist the tab to remove it. The old wafers can be removed along with the caps, since the new caps come with the insulated wafers. To install the new caps, I’ve found that mounting the new insulated wafer first is best. Now when you install each cap, make sure you are aligning the cap exactly the way it was originally, so the diodes, wires, etc can be tied to the terminal strips on the caps. Most of the time, the old diodes, and wires have long enough leads on them for re-installation. You might want to install new higher rated diodes at this time, since you’ve got it all apart anyway.
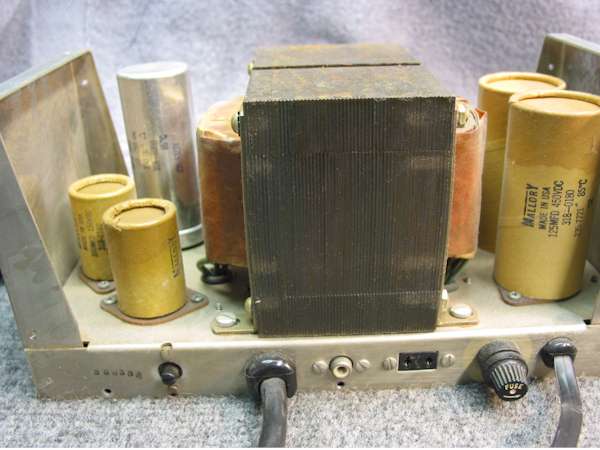
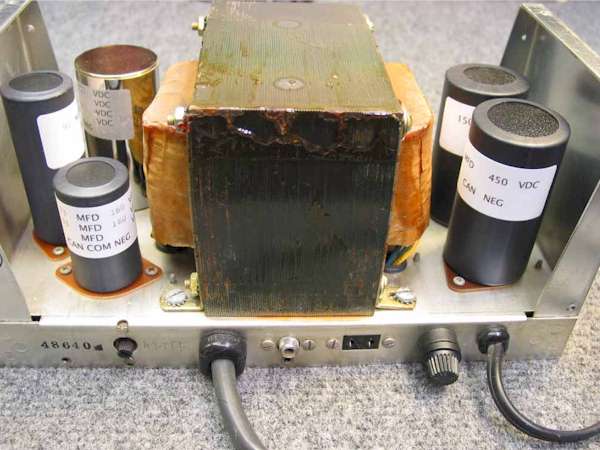
AC-4 with the original filter capacitors AC-4 Upgrade with Hayseed Hamfest capacitors
NOTE: For the caps that were soldered to the chassis, I use the 300-watt solder gun to make sure there is good flow to the chassis. This is good, but to make a better ground connection take bare buss-wire and tie it from one of the Twist-Tabs to a good ground terminal near by. The time it takes to do all this is about one hour and maybe longer for someone that has not done soldering for a while. As you can see, the top of the AC-4 now looks like it did back 30 to 40 years ago, but now should last another 30 years or so. I’ve been using one of the re-built AC-4’s with the ‘Twist-Type’ caps for many weeks and find it works great and it sure looks good as it did 30-40 years ago. There is a change in the fuse rating for the later AC-4’s. Drake was using a 5-amp fast-blow fuse originally, but in the later units, they were using a 6 ¼-amp slow-blow fuse, so install one of those when doing the new upgrade. One other note, there is also a 3-wire A.C. cord on the later units. Enjoy your Drake gear!
Hayseed Hamfest Fredericksburg, Iowa
|
|
|