|
WB4HFN Home Page Drake Technical Tips Menu Drake Home Page Collins Home Page Heathkit Home page |
|
Low Cost Power Switch Replacement For the Drake L-4B & L-7 Amplifiers Written by: Ronald Baker / WB4HFN |
When the Drake L-4B or the Drake L-7 power switch becomes
defective there are very few repair options except to replace it with one
from a parts amplifier. The original switch is no
longer available from any supplier that we know of. Those
replacement switches from a parts amplifier sell upwards of $125.00
or more on eBay. Now there is a new lost
cost option sold through www.KE9PQ.com, Nationwide Radio & Equipment Sales. The owner, Mark
 Olson, has available a replacement kit to completely
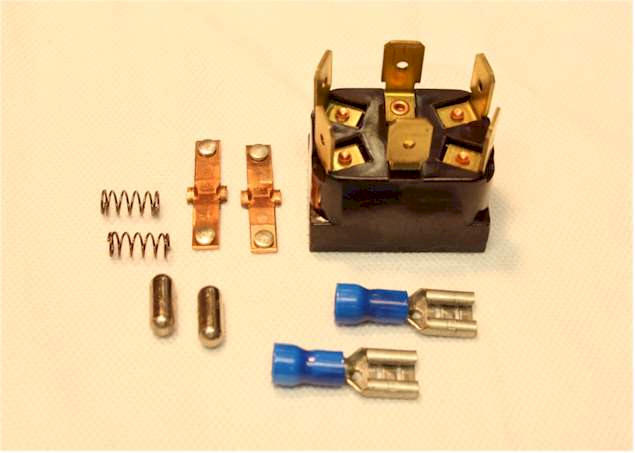
rebuild the power switch. The kit includes the back
half body of the switch housing containing stationary spade lug
contacts, two rocker arm contacts, tension springs & pistons, and
crimp-on connectors. Everything you need to completely rebuild
the L-4B or L-7 amplifier switch. Olson, has available a replacement kit to completely
rebuild the power switch. The kit includes the back
half body of the switch housing containing stationary spade lug
contacts, two rocker arm contacts, tension springs & pistons, and
crimp-on connectors. Everything you need to completely rebuild
the L-4B or L-7 amplifier switch.The new
switch housing comes with 6 spade lugs, the original L-4B switch only has
five lugs, so to avoid wiring confusing later I
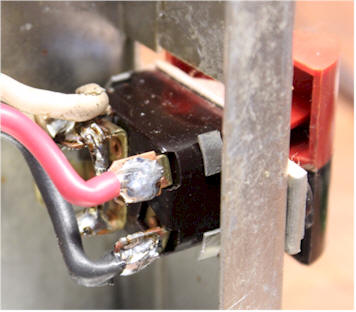
Now remove the old power switch, unsolder each wire carefully so you will know where they go back on the new switch housing. I suggest making a wiring drawing showing where each wire goes. Once the old switch is removed, pull loose the switch wiring and prepare the wires to receive the new crimp-on spade lugs. Some contacts will have two wires, a large and small wire, both will go into the spade lug, then crimp the spade lug to firmly holding the wires in place. Do the same for all five connections. Next take the old defective switch and
carefully pry up the 4 corner tabs as shown in the picture to remove
the switch handle assembly from the switch body. Be
careful not to
While holding the new switch housing upright place the switch handle assembly over that and snap that back onto the switch body, and make sure all four corner snaps are firmly in place in each corner of the switch contact housing. Once reassembled, verify the switch is snapping back and forth correctly and check to make sure the contacts are making and breaking correctly with an ohm-meter. Once the switch is reassembled, mount it back
to the amplifier chassis and attach the spade lugs you prepared
previously to the lugs on the switch according to the wiring drawing
you did before removing the switch. After everything is
back in place verify the wiring is correctly wired to the switch
with an ohm-meter. As an alternative to using the crimp-on spade lugs, for a more permanent connection you can drill out the small hole on each spade contact and solder the wire directly to the switch housing assembly as shown in the picture below. To remove the old switch from the amplifier you will need to remove the knobs and front panel to get to the two mounting screws holding the switch to the front sub panel. Make sure you save the square metal washers that extend the switch away from the sub-panel. Those spacers allow the switch handles to be flush with the front panel. Good luck with your amplifier power switch replacement. I have done a few of these now in my shop and the newly rebuilt switch works perfectly, and you don't need to spend a fortune for an original replacement switch from a parts amplifier. Who knows if that parts amplifier switch is good or bad to start with. 73, Ron / WB4HFN -------------------------------------- The kit is available from: www.ke9pq.com Selling price is $24.99 each Product Name: Drake L-4B, L-7, & L-75 Amplifier Replacement Power & CW/SSB Switch Assembly
|
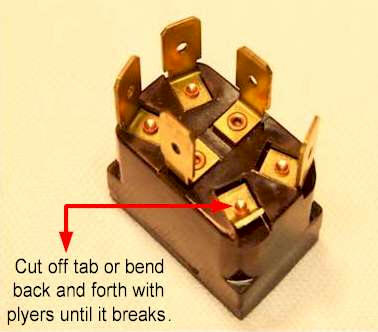 suggest cutting off one of the lugs on one end as shown in the
picture. The amplifier power switch is a double gang switch
with one side a SPDT switch, and the other side is
a SPST. The replacement switch housing is a double SPDT
switch, thus one contact is removed to create the SPST side of the
switch.
suggest cutting off one of the lugs on one end as shown in the
picture. The amplifier power switch is a double gang switch
with one side a SPDT switch, and the other side is
a SPST. The replacement switch housing is a double SPDT
switch, thus one contact is removed to create the SPST side of the
switch.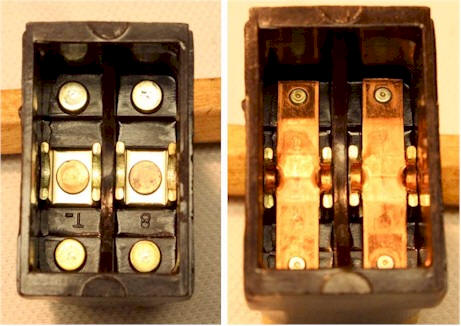 Hold
the new switch body upright and insert the two rocker arms into the
body as shown in the picture on the left. Make sure they rock
back and forth freely in the middle contact cradle, and make sure
the rocker arm contacts are laid in the housing correctly so the
fixed contact mates to the rocker arm contact.
Hold
the new switch body upright and insert the two rocker arms into the
body as shown in the picture on the left. Make sure they rock
back and forth freely in the middle contact cradle, and make sure
the rocker arm contacts are laid in the housing correctly so the
fixed contact mates to the rocker arm contact.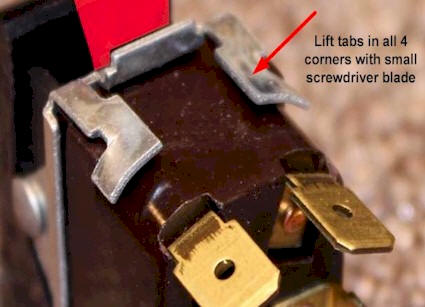 bend
them to far and slightly bend the mounting tabs back in place so the
switch handle assembly will re-snap over the new switch housing.
The kit includes new springs and pistons for the switch handles, but
those will not be needed unless the same inside the switch handles
are broken. In most cases the original tension spring
and piston will be okay to reuse.
bend
them to far and slightly bend the mounting tabs back in place so the
switch handle assembly will re-snap over the new switch housing.
The kit includes new springs and pistons for the switch handles, but
those will not be needed unless the same inside the switch handles
are broken. In most cases the original tension spring
and piston will be okay to reuse.