Drake Home Page Drake Technical Tips Menu
![]()
|
The Drake AC-4 And AC-3 Power Supply Upgrade By: Jeff Covelli / WA8SAJ E-mail: wa8saj@ncweb.com History: The Drake AC-4 power supply has been around since 1965. The AC-4 was used to power the TR-4, TR-4C, TR-4CW series of transceivers and all the transmitters such as the T-4, T-4X, T-4XB and T-4XC. Well, after all those 40 years, the AC-4 has seen some aging like all of our other older gear. The electrolytic caps are drying out, some shorting and some just opening up and causing hum and no regulation at all. The one part of the supply that has caused problems is the “bias” –45 to –65 volts for the final tubes. When the “bias” caps decide to start going, the supply will not be able to keep the final tubes “cut off” and we all know what happens then! The finals start to conduct at full throttle and the finals have a nice “red glow” to them causing the 6JB6’s to burn up. I like to see the glow of the tubes, but this is not the time for admiration. At the cost for 6JB6’s today ($20 to $30 each) this could be a costly problem. One of the other problems is the +700 volt supply has been known to lose one of the filter caps causing the power output to be around 50 watts, which should be 200 watts in a TR-4 series transceiver. All these problems have just recently started to occur, not bad for a power supply that has really been reliable for all these years. Rescue: Another ham has come to the rescue to the AC-4 dilemma. Mike Bryce (WB8VGE) from Sun Light Energy Systems 955 Manchester Ave. SW North Lawrence, Oh 44666 (330) 832-3114 has come up with a circuit board that will replace all the chassis mounted components except the power transformer and bias control for a fraction of the cost of replacing everything separately. Mike also has a web site called the Heathkitshop.com and your wondering why a fella would be making Drake replacement parts, well he started this project by building a circuit board for the Heathkit HP-23 and it works great for all those Heathkits. I contacted Mike along with many other hams having the problems with the aging AC-4 and with a little convincing, he thought why not, since the Heathkit circuit board worked so well, another one would with the layout for the AC-4 might just work. Well, I can tell you it has. I have installed over 20 of these and they work very well. The new circuit board is called the AC-4R replacement PCB. Getting Started: When you get the box full of parts,
Mike cautions you on the fact you are working with high voltage and to be very
careful! The instructions are good and to the point. The
box comes
A side note to the AC-4 upgrade, the later AC-4 supplies have a 6.25 amp slo-blo fuse compared to the original 5 amp standard fuse. The reason for the upgrade is, the inrush current when turned on would cause the 5 amp to blow once in a while and the 6.25 amp will help this problem. It works: As I said earlier, I have done 20 or so of the AC-4R rebuild kits and they all worked very well after wiring as per the instructions. I noticed the transmitters have better regulation due to the improved filtering and the scope also looks cleaner when keyed at full power (200 watts output on a TR-4). With the advent of collecting Drake and other older tube gear, this is a great help for the folks that want to keep the Drakes running for many years down the road. I hope to hear more of the revived Drake gear on the air soon.
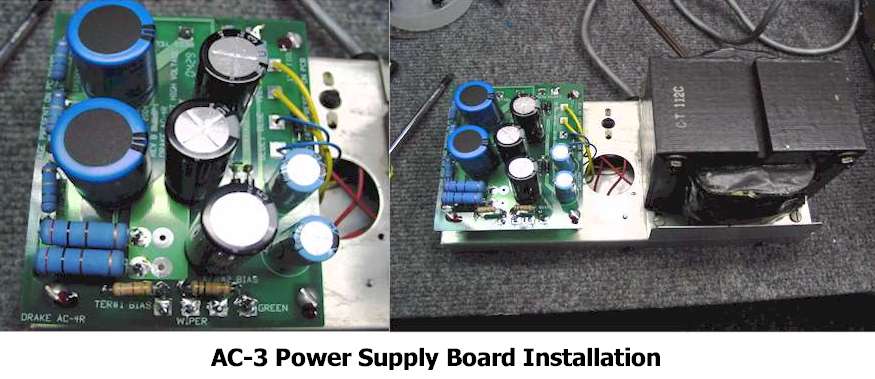
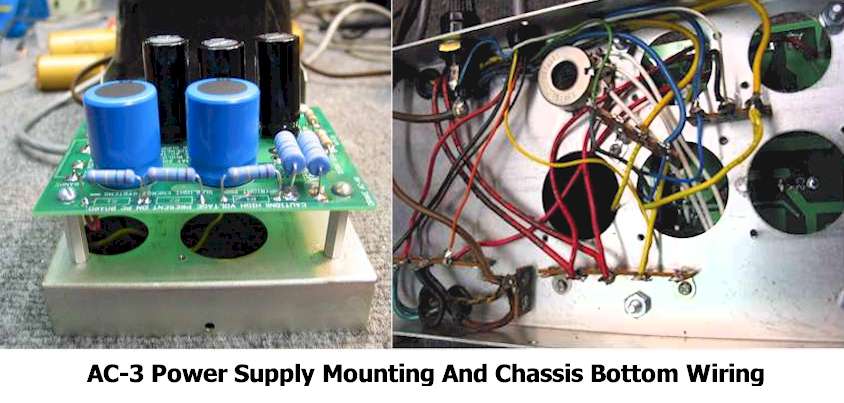
AC-3 Upgrade: The AC-3 is slightly different in layout than the AC-4 as you can see from the pictures. The wiring is the same as far as colors, but you will have to drill 4 small holes in the AC-3 chassis to accommodate the 4 hex spacers provided by Mike in the AC-4R kit. You will see that the “high-voltage” bleeder resistors are mounted on the right side of the chassis, so the wiring can be used towards the majority of the AC-3 supply. I have done many of the AC-3’s and they work great also. Good luck and have fun.
73, Jeff Covelli / WA8SAJ 5368 Melody lane Willoughby, Oh 44094 The Heathkit Shop Website: |
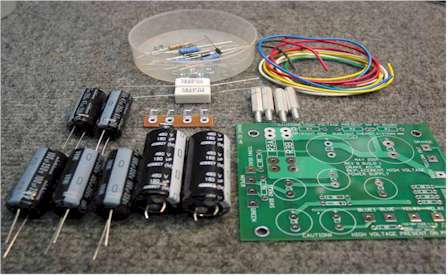 complete
with all the filter caps, diodes, resistors, colored wires, and hardware.
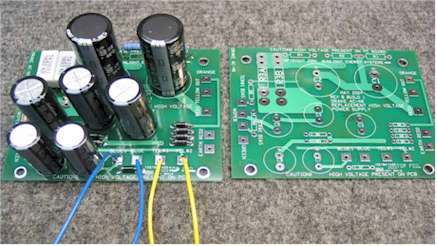
To start, you end up removing most of the parts on
the side with the smaller capacitors. Then you have to assemble the
circuit board with the new components and they are very good quality and much
smaller in size than the originals. The AC-4R actually has some
upgraded components compared to the original parts in the AC-4 supply.
The high voltage caps have been increased in filtering with 150 ufd compared to
the 125 ufd for the originals and the bias supply caps are 47 ufd compared to
the 22 ufd. There is a 100 ohm resistor at 5 watts that has been
replaced with two 200 ohm in parallel at 10 watts, the 100 ohm resistor used to
open up in the screen supply, so this should eliminate that problem.
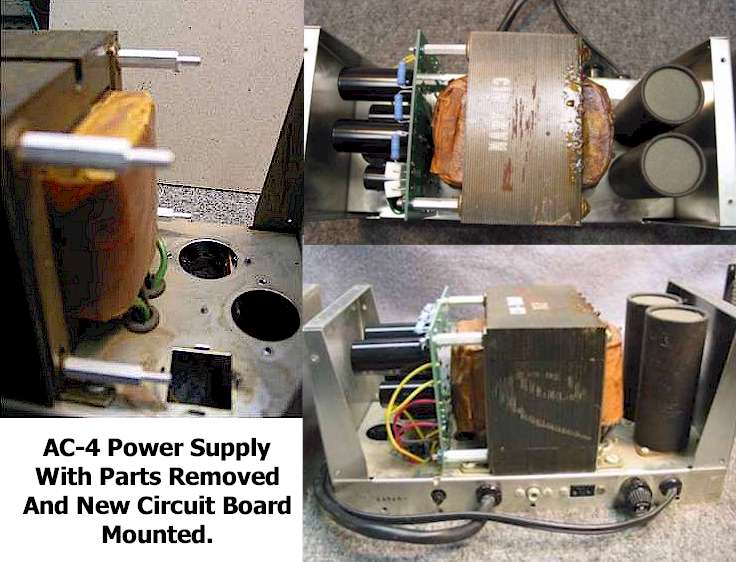
There are some slight variations of the AC-4 that can cause a little
frustration. One is the power transformer on some have the mounting
screws opposite from where they should be, so you only have to remove them and
reinstall them the way the instructions show.
By the way the new AC-4R board mounts on top of
the chassis compared to having all the parts on the
bottom of the chassis.
complete
with all the filter caps, diodes, resistors, colored wires, and hardware.
To start, you end up removing most of the parts on
the side with the smaller capacitors. Then you have to assemble the
circuit board with the new components and they are very good quality and much
smaller in size than the originals. The AC-4R actually has some
upgraded components compared to the original parts in the AC-4 supply.
The high voltage caps have been increased in filtering with 150 ufd compared to
the 125 ufd for the originals and the bias supply caps are 47 ufd compared to
the 22 ufd. There is a 100 ohm resistor at 5 watts that has been
replaced with two 200 ohm in parallel at 10 watts, the 100 ohm resistor used to
open up in the screen supply, so this should eliminate that problem.
There are some slight variations of the AC-4 that can cause a little
frustration. One is the power transformer on some have the mounting
screws opposite from where they should be, so you only have to remove them and
reinstall them the way the instructions show.
By the way the new AC-4R board mounts on top of
the chassis compared to having all the parts on the
bottom of the chassis.
 The other transformer change is, some have tar on the
older AC-4’s, so I have mounted the board as
instructed with two angle brackets and using the bottom screws of the
transformer to hold them perfectly. Once
all the wiring is done you are ready to fire up the renewed AC-4. I
have a mating connector I use for turning on the
AC-4 without using a radio. I like this
approach, that way you are not harming the radio if you made a big mistake.
You can short out pins 1 and 2 of the power plug and this will do the same thing
as having the radio hooked up. I use a Variac to bring up the AC-4
slowly, then check the high voltage (+700v) first, then screen supply (+250v),
the bias (-65v) and filament supply (12.6 vac).
The other transformer change is, some have tar on the
older AC-4’s, so I have mounted the board as
instructed with two angle brackets and using the bottom screws of the
transformer to hold them perfectly. Once
all the wiring is done you are ready to fire up the renewed AC-4. I
have a mating connector I use for turning on the
AC-4 without using a radio. I like this
approach, that way you are not harming the radio if you made a big mistake.
You can short out pins 1 and 2 of the power plug and this will do the same thing
as having the radio hooked up. I use a Variac to bring up the AC-4
slowly, then check the high voltage (+700v) first, then screen supply (+250v),
the bias (-65v) and filament supply (12.6 vac).