Drake Home Page       Drake Technical Tips Menu

Drake PTO: Smooth and Silky!

Presented here is a method that I use for improving the feel of the PTO tuning mechanism on Drake C-line radios.  It may be applicable to other models as well, but I've not tried it.  This information is provided on a YOU-TAKE-ALL-THE-RISK basis.  If you ruin your radio, or have a problem, it's totally your responsibility, so if you're not comfortable, STOP NOW.  This procedure does NOT apply to those R4-C rigs that have the metal gears.  Also, if you have an older 4-position R4-C, your rig may be slightly different from the one shown here.  Adapt!

What causes the problem, how do I tell if this repair will work?

The biggest culprit is oil.  The dial mechanism is meant to work DRY, and (other than the ball-bearing raceway and worm-drive) should never be lubricated.  If your gears look greasy, oily, or otherwise WET, your radio's been hosed and you need to (at least) clean the gears and get back to the basic dry nylon.  The problem is that nylon is oil-philic and expands when oiled.  So, those tight fitting plastic boss/bushing pairs become an interference fit, and get very hard to turn.  This procedure is basically removal of oil, and mild sanding of the surfaces to return them to the proper fit.

There are three main sites for problems, and they each introduce unwanted friction in a slightly different way.  The three sites are:

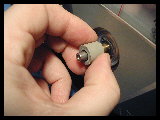
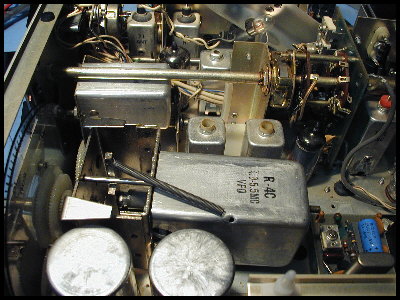
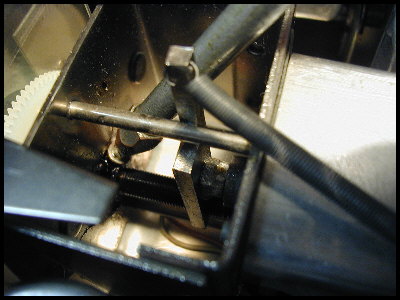
  1. The ball bearing raceway.  The grease here gets dry and hard, and make everything feel sluggish.  If this is the only problem your radio has, you're in luck, because it's easy to fix WITHOUT DISASSEMBLY!  If you want to try fixing just this, jump ahead to step Four-C below and give it a go.  Be careful not to get oil on any other spot, or you could make things much worse!
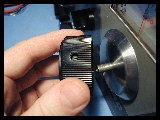
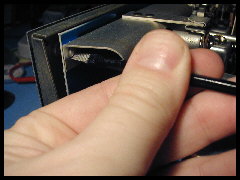
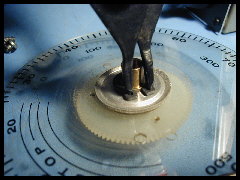
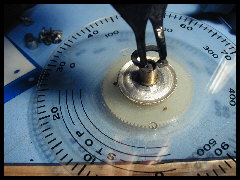
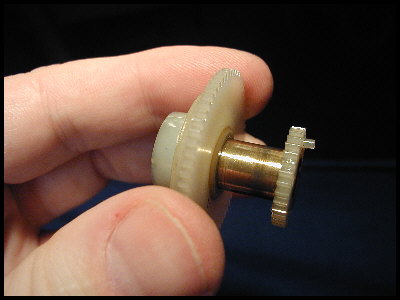
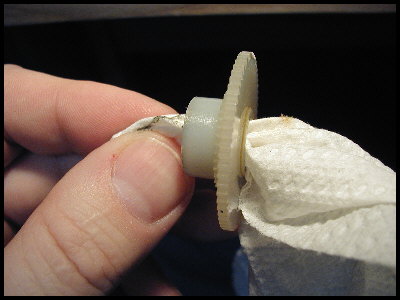
  2. The brass boss inside the plastic gear/bushing.  As shown in the photos below, this is the innermost gear-related bushing, and the first contact with plastic as you go outward from the central shaft.  If it's been oiled, the pair will need cleaning and the inside of the gear will need to be lightly sanded.
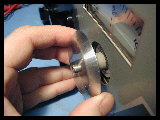
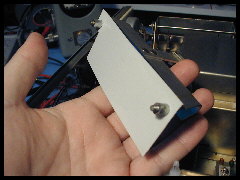
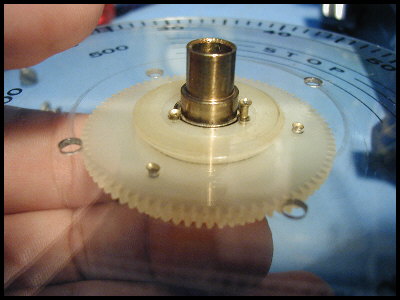
  3. The plastic boss on the inter-dial gear assembly.  This is the interface between two plastic parts, in a boss/bushing arrangement.  If they've been oiled they will BOTH swell; it's usually the tightest point in mis-functioning assembly.

(Of course there are other places that can cause tightness, such as the worm drive, etc.  Someone else will have to tell you how to fix those...)

The general rule of thumb (and forefinger) is a follows:

  • If the tuning feels tight but "greasy", in that it does move but with NO stick-slip it's probably item 1 above.
  • If the tuning feels uneven, easy then hard then easy again, (but still no stick-slip) it's probably item 2 above.
  • If the tuning feels like it has stick-slip, it's undoubtedly got item 3 above.

"Stick-slip" is where you apply force to move or turn something and it doesn't move at all until you push it hard enough to jump, herky-jerky, and then stops again.  This is (in my opinion) the most annoying of the above 3 symptoms; it makes it virtually impossible to fine-tune a radio's frequency.

Here's how to fix it...

Required tools:

  1. Philips and slotted screwdrivers
  2. E-ring/clip-ring tool (looks like a pair of funny pliers with two skinny round pointed tips)
  3. Screw holder/starter
  4. Magnetic screw fetcher (for when you drop the hardware into places unknown)

Part One: Gain access to the PTO.

Be sure that your radio is unplugged from everything before starting. To work on the PTO, you'll need to remove top and bottom covers of your radio.  In the photo shown at the right is the PTO nestled in place in a typical R4-C.  You may have a noise blanker above it, which you'll need to remove. Once you're at this point there are a few other parts that need to come out. 

Part Two: Remove the surrounding stuff.

Remove the tuning knob, the dial skirt and the rubber doughnut as shown.

Remove the light bracket that is above/behind the dials by removing the two slotted screws, one on each side.  The in-board one is hard to see, and you'll probably drop the metal spacer into the radio.  Be prepared to fish it out.  Shown at the immediate right is a screwdriver in place ready to remove the near screw, at the far right is the unit in my hand.  Once you have it out, take off the two spacers, the white and blue filters and the two screws and put them aside.  Now, put the remaining metal bracket on the other side of the radio, out of harm's way.

Remove the in-board noise-blanker bracket, and your rig should now look like the photo at the right, ready for PTO removal.

Part Three: Remove the dial assembly

The PTO is held in place by three slotted-head screws, accessible from the bottom of the radio.  You may have to push a few wires aside to gain access to the heads of the screws. In each of the rigs I've worked on there was a "service loop" on the three wires going from the PTO to the nearby PC board, so I didn't have to unsolder anything.  Your experience may differ, so be ready to make a note of what wires you remove from where.

With the three screws removed, you can now separate the PTO from the dial assembly.  Holding the small bushing that extends on the front of the dial assembly with your left hand, you can now pull the PTO to the right, and gradually extract the shaft from the dials.  If you feel anything tugging, find out what it is, don't just yank.  With a little care you should be able to free the dial assembly from the main PTO shaft, and then lift the dials up and out of the radio. It is normal for the large idler gear (the one nearest you) to come out of position and basically fall free.  Don't lose it.

Part Three: Determine where the problem is

As described above there are three places where the biggest friction can be introduced.  Now that you've got the assembly out of the radio, try turning each one by itself, feeling how tight or loose they seem.  If your radio is typical, you may find that two or even all three are tight.  Whatever the case, now you know what to fix. Depending on what you find, you may need to do some combination of steps Four-A, B and/or C.

Part Four-A: Fix a tight inner bushing (brass on plastic)

To gain access to the inner bushing, you'll need to remove the clip ring that secures the inner hollow (brass) shaft.  As shown, this is done with a clip-ring pliers (required).

Remove the three small brass "ferrules" that hold the gear to the front (1's) dial.  The photo at right shows them with one pulled half-way out.  As shown below (in step Four-B), you can use a small pair of diagonal cutters (or your fingernail) to pry them loose.  DO NOT LOSE THEM!!!!

You can now remove the inner hollow shaft with the mating plastic gear.  Notice how oily this one looks, and it does in fact resist turning.

Using a paper towel, give the parts a good cleaning.  I don't generally use any solvents for fear of further damaging the nylon gears.

Give the bushing inside the plastic gear a light sanding, testing occasionally with the (now clean) brass shaft.  Be sure to wipe away any plastic powder before testing.  Once the pair turn really freely, stop sanding.  Use only 600 grit sandpaper, nothing coarser.  Your technique should be to rotate the gear around the sandpaper cylinder, applying light outward pressure.  Always work in a circular fashion, never in-out.  Change the part of the sandpaper that you're using frequently, as it will quickly load up with plastic powder.

Part Four-B: Fix a tight outer bushing (plastic on plastic)

If you haven't already, remove the clip ring to gain access to the gear assembly and outer bushing.

Carefully remove the three ferrules that hold the gear to the rear (100's) dial.  A fingernail is ok, but I prefer light pressure with a small pair of flush-cutting diagonal cutters.  DON'T SQUEEZE!  A light tug is all it takes.  Also, be sure not to lose the things, or you're really in trouble.  Once out, give all of the parts a really good cleaning with a paper towel.

Give the bushing inside the plastic gear a light sanding, testing occasionally with the boss on the mating plastic gear.  Be sure to wipe away any plastic powder before testing.  Once the pair turn really freely, stop sanding.  Use only 600 grit sandpaper, nothing coarser.  Your technique should be to rotate the gear around the sandpaper cylinder, applying light outward pressure.  Always work in a circular fashion, never in-out.  Change the part of the sandpaper that you're using frequently, as it will quickly load up with plastic powder.

Part Four-C: Fix a stiff ball-bearing raceway

This one's really easy.  Using an oiler, put a drop or two of 40-weight motor oil on the balls.  Don't over do it, a little goes a long way.

If you've jumped here from above, and it works, you're one of the lucky few, since you didn't even have to disassemble things to do this!

Note: If the raceway is still tight feeling after lubricating, it might be adjusted to push too tightly on the balls. This adjustment is best left to the experts, since it involves putting an Allen wrench inside the PTO. 

Part Five: reassemble

Reverse the disassembly procedure.  Once back together, the hardest part is getting the dials to indicate the correct frequency again.  This is achieved by using the two spring-loaded arms on the front of the PTO housing.  By pushing sideways on one arm at a time, you can freely rotate either the front or back dial without changing the current frequency.  I find it easiest when using a frequency counter on the INJ line (on the back of the receiver) to give myself a reference, and then rotating the dials as needed to match.  If done carefully, you should be able to arrive at a point where the 0 (zero) on the front dial matches up with the red line AND the 0 in the center of 100, 200, etc. on the back dial.  Take your time and work methodically.

Part Six: Enjoy your "new" radio!

If you've done the job correctly, you should now have a radio that you can tune with your little finger with ease.  I've yet to have one where this didn't work, and the results are often quite spectacular.  If you can get over your fear of screwing things up, this is one job that is REALLY worth while

Now, PUT THE OIL CAN AWAY!

This material provided by Neil, K1VY as a public service.  Usage is at solely your risk, I've done my best to make it accurate, but I can't be held responsible for problems you may encounter.  Email to K1VY@arrl.net